
You can select your output format in a dialog box. You have the following possibilities:
-
"Printer"
allows graphic output of the current screen contents (graphical representation) to the WINDOWS standard printer or to any other printer selected using the menu item "File/Output preferences". But you may also select a different printer in the following dialog box by pressing the "Output prefs./change printer" button.
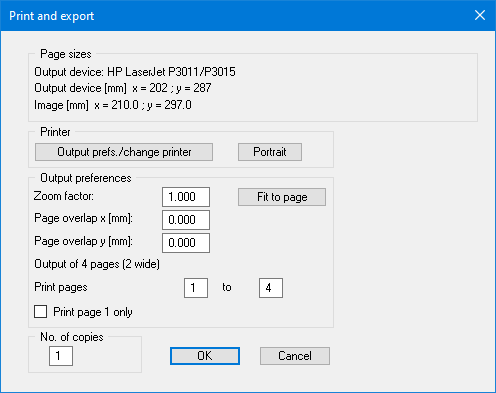
In the upper group box, the maximum dimensions which the printer can accept are given. Below this, the dimensions of the image to be printed are given. If the image is larger than the output format of the printer, the image will be printed to several pages (in the above example, 4). To facilitate better re-connection of the images, the possibility of entering an overlap for each page, in x and y direction, is given.
Alternatively, you also have the possibility of selecting a smaller zoom factor, ensuring output to one page ("Fit to page" button). Following this, you can enlarge to the original format on a copying machine, to ensure true scaling. You can also print only the 1st page with zoom factor = 1.0, in which case the bottom left-hand area is printed. Furthermore, you may enter the number of copies to be printed.
-
"DXF file"
allows output of the graphics to a DXF file. DXF is a common file format for transferring graphics between a variety of applications. -
"GGU-CAD file"
allows output of the graphics to a file, in order to enable further processing with the
GGU-CAD program. Compared to output as a DXF file this has the advantage that no
loss of colour quality occurs during export. -
"Clipboard"
The graphics are copied to the WINDOWS clipboard. From there, they can be imported into other WINDOWS programs for further processing, e.g. into a word processor. In order to import into any other WINDOWS program, you must generally use the "Edit/Paste" function of the respective application. -
"Metafile"
allows output of the graphics to a file in order to be further processed with third party software. Output is in the standardised EMF format (Enhanced Metafile format). Use of the Metafile format guarantees the best possible quality when transferring graphics.
If you select the "Copy/print area" tool ![]()
Using the "Mini-CAD" program module you can also import EMF files generated using other GGU applications into your graphics (see menu item “Graphics preferences/Mini-CAD”).
-
"Mini-CAD"
allows export of the graphics to a file in order to enable importing to different GGU applications with the Mini-CAD module. -
"GGUMiniCAD"
allows export of the graphics to a file in order to enable processing in the GGUMiniCAD program. -
"Cancel"
Printing is cancelled.