
An editor for each layer polygon can be opened with the mouse by clicking in the appropriate polygon with the left mouse button. The following box appears:
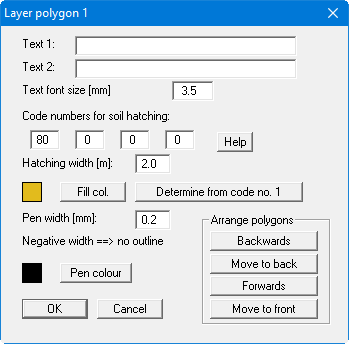
A defined polygon can be automatically labelled using the input in the two text lines. You can define the font size, the position is determined automatically. The program determines the centre point of your defined polygon and places the two text lines centrally at that point. The text background is deleted. If the automatically positioned texts collide with other graphic elements leave the text lines in the above editor box empty and add the annotation as texts using the Mini-CAD system (see "Mini-CAD" manual).
If the program automatically allocated a code number when defining polygons, the corresponding soil colour has already been adopted. However, after clicking the "Fill col." button it is possible to select a different colour or to adjust the fill colour after entering different code numbers by pressing the "Determine from code no. 1" button.
The polygon outline can be altered to suit your needs by adjusting the pen width and colour.
If more than one polygon is present the "Arrange polygons" field appears. The polygons are displayed in the sequence in which they were drawn, i.e. those defined first are further back and those defined last are at the front. This sequence can be altered by clicking the buttons. The following options are available:
-
"Backwards" polygon will be moved back by one position
-
"Move to back" polygon will be moved to the rearmost position
-
"Forwards" polygon will be moved forwards by one position
-
"Move to front" polygon will be moved to the foremost position