
Click the"RCS 1" button in the original dialog box. The following dialog box for editing the stratigraphic log opens:
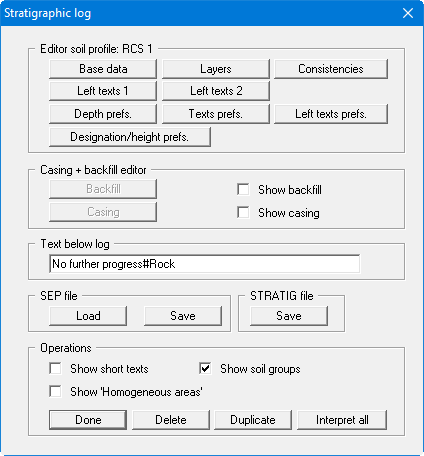
The following actions can be started in the subsequent dialog box for the selected RCS 1 stratigraphic log:
-
"Base data"
You can enter or edit the base data for the selected stratigraphic log (see notes in
Section “Enter base data of a stratigraphic log”). -
"Layers"
You can edit or enter the horizon structure for the selected stratigraphic log (see notes in Section “Define layers of a stratigraphic log ("Layers" button)”). -
"Consistencies"
You can enter or edit the consistency symbols to German Standard DIN 4023 for this stratigraphic log (see notes in Section “Define consistencies of a stratigraphic log ("Consistencies" button)”. -
"Left texts 1" and "Left texts 2"
Additional descriptive annotations can be added to the left of the stratigraphic log using these two buttons, e.g. water content, LOI, sample data, etc. (see notes in Section “Enter "Left texts" ("Left texts 1" and "Left texts 2" buttons)” and for samples in Section “Samples: interpretation using SEP 2 abbreviations”). -
"Depth prefs."
You can specify preferences for the presentation of layer depths. By selecting the "Abs. heights only" check box, the absolute height will be used (e.g. mAD) instead of the depth from the top of the stratigraphic log. With "+ abs. height", the absolute height will be given, additionally to the depth from the top of the stratigraphic log. By selecting the "Depth labelling at left" check box, the depth labelling will be entered at the left side of the stratigraphic log. The depth setting for all stratigraphic logs in a file (= geological section) can be activated using the "Apply to all" button ("Depth labelling" tab) in the "Input/Stratigraphic log" dialog box (see Section “Opening the editor for creating a new or selecting an existing stratigraphic log“). -
"Texts prefs."
Using this button, you can edit preferences for the presentation of the layer descriptions (see notes in Section “Edit text preferences ("Text prefs." button)“). -
"Left texts prefs."
Clicking this button allows editing preferences for the presentation of the "Left texts 1" and the "Left texts 2" (see notes in Section “Edit layout of "Left texts" ("Left texts prefs." button)“). -
"Designation/height prefs."
The alignment and distance [mm] of the name and elevation data relative to the upper edge of the log can be individually specified for the individual stratigraphic log (also see notes in Section “Notes on the "Designation and position" group box“). -
"Backfill"
First, activate the "Show backfill" check box. Then, using the "Backfill" button you can enter or edit the horizon structure of a backfill for your stratigraphic log (see notes in
Section “Defining backfill layers ("Backfill" button)“). -
"Casing"
First, activate the "Show casing" check box. Then, using the "Casing" button you can enter or edit a casing for this stratigraphic log (see notes in Section “Defining gauge casing layers“). -
"Text below log"
In this field you can enter a text, which will be displayed below the log. To create a line break, you must enter a "#" (e.g., no further progress#concrete). -
"Load (SEP file)"
Clicking the button allows a file created using the SchichtenErfassungsProgramm (Strata Recording Program) SEP (Version 2) developed by LBEG (formerly NLfB) in Hannover, Germany to be imported. The abbreviations used in the SEP 2 program were developed for recording data from field investigations. The SEP 2 abbreviations are automatically interpreted and converted to the corresponding long text. The highest possible degree of compatibility between the GGU-STRATIG and GGU-BORELOG programs can be achieved by using the SEP 2 set of abbreviations. The SEP 2 abbreviations are described in more detail in Section “Layer input using SEP 2 abbreviations (recommended)“. -
"Save (SEP file)"
The abbreviation record can be exported in the LBEG Hannover SEP 2 program format. The only requirement is that stratigraphic data was entered using the SEP 2 abbreviations. The GGU-STRATIG program includes the SEP 2 abbreviations defined for the engineering geology field. Therefore, when exporting your bore log to a SEP 2 file, select the type "Engineering geology (IG)". An input box opens for the header data required by the LBEG SEP 2 program for every stratigraphic log. -
"Save (STRATIG file)"
The active soil profile can be individually saved. All data from the original file are transferred (overall view, page format, reference staff, legend settings, header data). -
"Show short text"
If this check box is activated the stratigraphic log is labelled using the short text. The short text for all stratigraphic logs in a file (= geological section) can be activated using the "Apply to all" button ("Short text/soil group" tab) in the "Input/Stratigraphic log" dialog box (see Section “Opening the editor for creating a new or selecting an existing stratigraphic log“). -
"Show soil group"
If this check box is activated the soil groups entered for the individual soil layers are shown in oval frames at the right of the stratigraphic log's long or short text in accordance with DIN 18196. The soil groups for all stratigraphic logs in a file (= geological section) can be activated using the "Apply to all" button ("Short text/soil group" tab) in the "Input/Stratigraphic log" dialog box (see Section “Opening the editor for creating a new or selecting an existing stratigraphic log“). -
"Show 'Homogeneous regions'"
By activating the check box, you can achieve visualisation of the regions of identical properties on the stratigraphic log defined and assigned by you in the "BIM" menu. -
"Done"
You will arrive back at the previous dialog box. -
"Delete"
The currently displayed stratigraphic log will be deleted. -
"Duplicate"
The currently displayed stratigraphic log will be duplicated. You will automatically find yourself in the "Base data" dialog box of the duplicated stratigraphic log. -
"Interpret all"
All stratigraphic log abbreviations entered are reinterpreted by pressing this button. This is useful if settings have been modified, e.g., for displaying the short texts (see menu item "Preferences/Abbreviations (SEP)"). This makes it unnecessary to click through all strata and reinterpret them individually.
If you also activate the "Interpret all soil profiles again" check box in the prompt, the strata in all stratigraphic logs in the current file are reinterpreted.