
The layering of the ground is described using this menu item. Any groundwater present does not need to be entered as a layer boundary, the program does this automatically. After clicking on this menu item, the following dialog box opens:
By clicking the "x soils to edit" button a further dialog box opens in which you can enter the number of soils. If more than eight soils are present, they can be viewed by navigating through the soil table using the "Forw." and "Back" buttons.
Using the "Common soils" button, you can easily select the soil properties of many common soils from a database or determine intermediate values. In the dialog box, which you open by pressing the "Common soils" button, open the "Soils_english.gng_ggu" file when first starting the program in English ("Edit table"/"Load" buttons). Then save the data set in the "Soils.gng_ggu" file on the program level in order to open your modified database file when the program starts. You can also enter your own data ("Edit table"/"x soils to edit" button) and save it in the "Soils.gng_ggu" file. You can also use your adapted file in other GGU programs by means of the "Common soils" function if you copy the file into the appropriate GGU program folder.
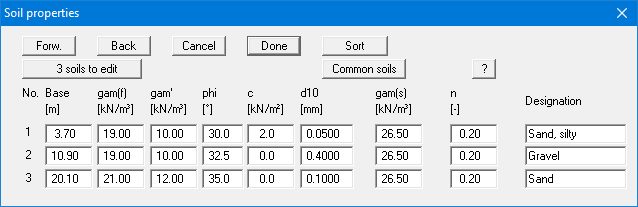
The properties for each soil are entered into the corresponding input boxes. These are:
-
Base = base of respective layer [m];
-
gam(f) = unit weight of wet soil [kN/m³];
-
gam' = buoyant unit weight of soil [kN/m³];
-
phi = friction angle of soil [°];
-
c = cohesion of soil [kN/m²];
-
d10 = grain size of soil for 10 % mass component [mm]:
-
gam(s) = soil grain density [kN/m³];
-
n = soil pore space [-].
If you have activated the "Use absolute heights" check box, the layer depths ("Base") are positive upwards, i.e. the layer depths must be entered in mAD.
The soils are sorted according to depth by pressing the "Sort" button. This is always done automatically after leaving the dialog box. You can also use this function to eliminate a soil from the table. Simply assign the soil to be eliminated a greater layer depth and then click the "Sort" button. The corresponding soil is now the last soil in the table and can be deleted by reducing the number of soils.