
If the file contains integrated graphics only the file name with complete path will be saved. If you are working with a file with integrated graphics the graphics file must thus always be saved with it.
Activate the "Graphics" icon ![]()
Once you have selected the desired image an editor window opens; this window can also be opened by double-click on an existing image.
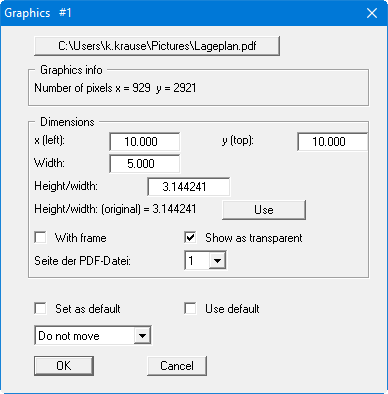
Further images can be loaded at any time by clicking on the uppermost button. "Graphics info" gives the number of pixels in the loaded image.
The size of the image can be altered using "Width" and the ratio "Height/Width". The height/width ratio of the original can be read off below the height/width input box. In order to import an undistorted image click on the "Use" button to the right.
The default width is always 5.0, which often represents a very small value in Mini-CAD (in metres in your system). It is probably better to set the width to a higher value, otherwise the graphics may be so small that they are difficult to click for further editing.
The image can be rotated by 180° by entering the width as a negative value. If you enter negative values for height/width the image will be mirrored around the x axis. You can mirror the image around the y axis by entering both inputs as negative values. Please note, however, that any text in the image will also be mirrored. This image must either be previously processed in a graphics application or the text hidden by a new text box after mirroring (activate the "Delete background" function) or by a "Polygon (filled, ...)".
If the image contains a large amount of white, it may be useful to frame the image. Activate the "With frame" check box to draw a frame around the image. Moreover, the image can also be represented transparently or opaque.
If you import a PDF file as a graphic, you can define which page of the PDF document is shown.
If you need to insert several images, the width setting and the settings for the frame and transparency can be used for the following images by clicking "Set as default". In contrast to new text input, graphics are always inserted in the current drawing layer, which is displayed in the blue title bar of the editor box by “#1”.