
You can define the soil properties in the following dialog box.
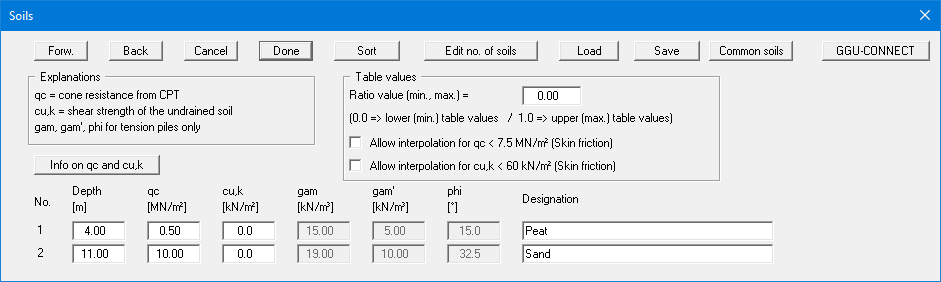
If you would like to edit the number of soils, select the "Edit number of soils" or "x soils to edit" button and then enter the new number of soils. Using the "Sort" button, you can have the soils sorted according to depth. This sorting will be carried out automatically when leaving the dialog box, without the function being explicitly called-up. Erroneous input is thus impossible from the outset.
If several soils have been entered, and you would like to delete a soil which is not at the end of the list, you can assign this soil a large depth (e.g. 99.0). Then select the "Sort" button. The soil will now be at the end of the table and can be deleted by reducing the number of soils.
Using the "Common soils" button, you can easily select the soil properties of many common soils from a database or determine intermediate values.
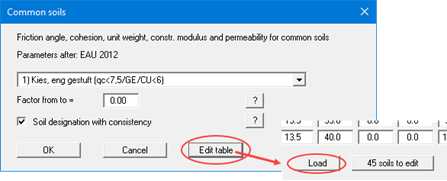
In the dialog box, which you open by pressing the "Common soils" button, open the "Soils_english.gng_ggu" file when first starting the program in English ("Edit table"/"Load" buttons). Then save the data set in the "Soils.gng_ggu" file on the program level to open your modified database file when the program starts. You can also enter your own data ("Edit table"/"x soils to edit" button) and save it in the "Soils.gng_ggu" file. You can also use your adapted file in other GGU programs by means of the "Common soils" function if you copy the file into the appropriate GGU program folder.
All project data can be entered and managed in the GGU-CONNECT program. If you have already stored your drilling data as a soil strata model in your project, you can load the soil strata and properties as an xml file using the "GGU-CONNECT" button in the above dialog box. A brief overview of the procedure in GGU-CONNECT for exporting the data to the GGU analysis programs can be found here:GGU-CONNECT - Export contents for GGU analysis programs
The layer depths are with reference to grade and are positive downwards, as are all other inputs. But if you have checked the "Use absolute heights" box in the dialog box in menu item "Edit/Ground level", the layer depths are positive upwards, i.e. the layer depths must be entered in m AD.
Explanations of the soil properties can be found directly in the dialog box and in the theoretical principles in Section “Pile design to EAP: General information on piles according to EA piles”). If the check box in the "Table values" group box is activated, the skin friction is interpolated even for a cone pressure qc < 7.5 MN/m² or a shear strength cu,k < 60 MN/m². Otherwise, the skin friction is set to 0.
If you have activated the "Ratio value (min., max.) for each soil separately" check box in the "Edit/Analysis options" dialog box, an additional "p" column appears for each individual soil layer, in which you enter the desired ratio value. in each case.
Previously, the values for sig02, sig03, sig10 and tau (qb,k02, qb,k03, qb,k10, qs,k) had to be defined for each soil type for bored pile analysis (see “Theoretical principles: Bored piles to DIN 4014 and DIN 1054”). These values are determined automatically to EAP via qc and cu,k from the appropriate tables.
The data for units weights and friction angle are only required when working with tension piles. They are therefore not represented in the dialog box shown above.